


Windows 10 lets you easily change the color and size of the mouse. You can easily customize the Pointers theme or download and install it in the exact method as you did in the previous versions of Windows.
Change the scheme by default
Cursor schemes in Windows have some built-in that allow you to change the default shape of the mouse pointer. This way the color ( black, white, or inverted ) and size ( default, large, or extra-large ) will change.
To start, open the setting by pressing the "windows+I" command on your keyboard, and click "Devices" from the given options.

Click the "Mouse" from the left pane until you see "Additional mouse options" and click on it.

Click on the tab labeled "Pointers".


Windows 10 also has a built-in method to change the color and size of your mouse pointer. You can change the settings from this app without changing any of the theme options in the Mouse Properties window.
How to Create a Custom Cursor Scheme?
If you like the majority but do not like all the schemes that Windows uses, you can change the individual cursor of the scheme. Each scheme consists of 17 cursors that apply to different situations when objects hover over your screen. After customizing the scheme, you can save it in the list of usable schemes.
Open the Settings app by pressing Windows + I on the keyboard, and click "Devices" from the available options.
Click "Mouse" on the configuration of the pane to the left, scroll through the options until you see "Additional Mouse Options" and click on it.
Click on the tab labeled "Pointers".
Now, from the list of cursors under the Customized section, click the one you want to change, and then click "Browse."

The file browser will open in the system folder containing all the cursors available for each scheme. Inside the folder, you will see two types of files related to the mouse pointer. They are .cur and .ani files. The former is an image of a static cursor, and the latter is an image of a dynamic cursor. Most cursors are static cursors, with only one pair that are actually dynamic (aero_bassi and aero_working).

Click the cursor you want to change, and click "Open" when finished.


How to Download & Install Custom Cursor Theme Packs?
If some of the options available aren't enough, you can download a third-party cursor theme pack to install on Windows. It's easy to make your system a personal flame. You will not find only white or black schemes.
Cursors-4U has thousands of free cursor themes to choose from. And if you want to customize the Windows mouse cursor, this is a great place to start.
Since there is no official Microsoft channel for downloading cursors, you should scan anything downloaded by your antivirus and try to download anything from unknown sources.
After downloading the cursor theme pack, open the contents in a folder so that you can access them in the next step.
Note: A custom cursor theme pack will usually be a zip archive and contains only the two types of image files we mentioned earlier: .cur and .ani.
Open the Settings app by pressing Windows + I on the keyboard, and click "Devices" from the available options.
Click "Mouse" from the left pane, scroll through the options and click on it until you see "Additional Mouse Options".
Click on the tab labeled "Pointers".
Now, from the Customized section, click the status of the cursor, and then click "Browse."
 |
| Image Source Google - Image by How-To Geek |
Cursor Go to the folder containing the files, click on the file with the same name, and then click "Open".
 |
| Image Source Google - Image by How-To Geek |
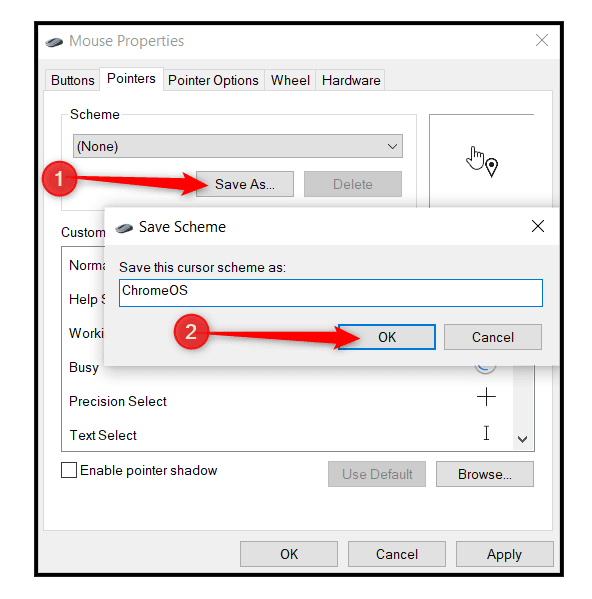
Repeat the process for each entry in the list and when you are finished, click "Save", name it, and then click "OK" to save the custom scheme.
 |
| Image Source Google - Image by How-To Geek |
Now, if you ever want to switch between themes, you can select it from the preset schemes in the drop-down menu.
 |
| Image Source Google - Image by How-To Geek |
When you finish saving the scheme, click "Request" to start using it, and you can safely close the window or add someone else to the list.

0 Comments